こんにちは。エンジニアの辻です。
前回(JS奮闘記【JavaScriptとcanvasと線形変換 ~回転編~】)は、線形変換を使ってcanvas上のボックスを回転させてみました。
さて、ボックスを回転できるようになったのは良いのですが、回転の中心は原点のままです。
今回は回転の中心を原点ではなく、任意の点にした上でボックスを回転させてみたいと思います。
任意の点を中心として回転させる線形変換
まずはこちらをご覧ください。
この数式が任意の点を中心として回転(反時計回り)させる線形変換の計算式になります。
前回扱った式と似ていますね。
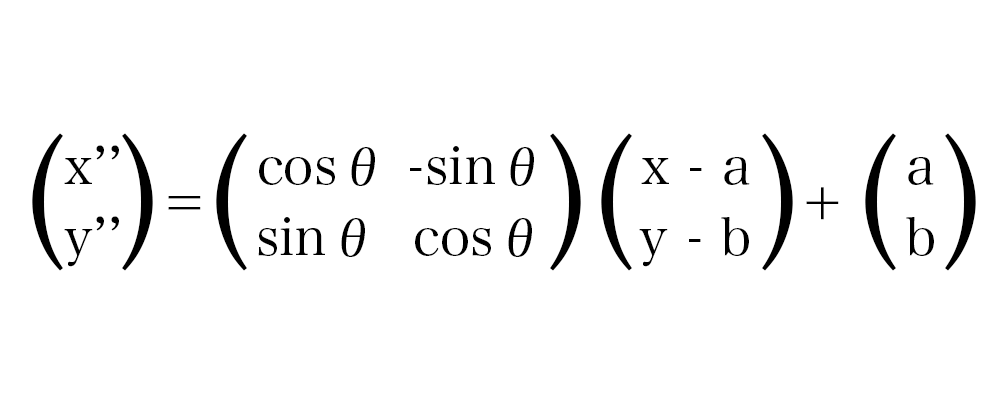
なぜこの数式で任意の点を中心とした回転が可能なのか解説していきます。
なんか難しそうですが、処理を1つずつ追っていけば大丈夫です!
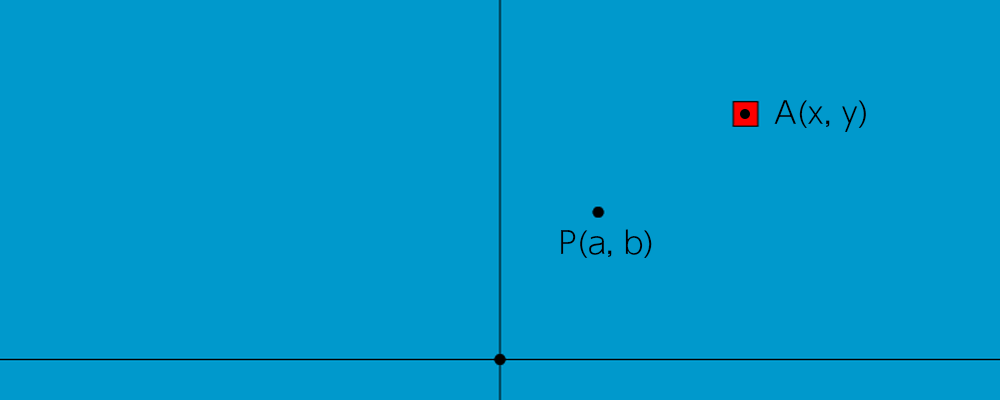
まず、以下の2次元平面をご覧ください。
点Pが回転の中心点であり、座標は(a, b)とします。
点Aが回転対象の赤ボックスの中心点です。座標は(x, y)とします。
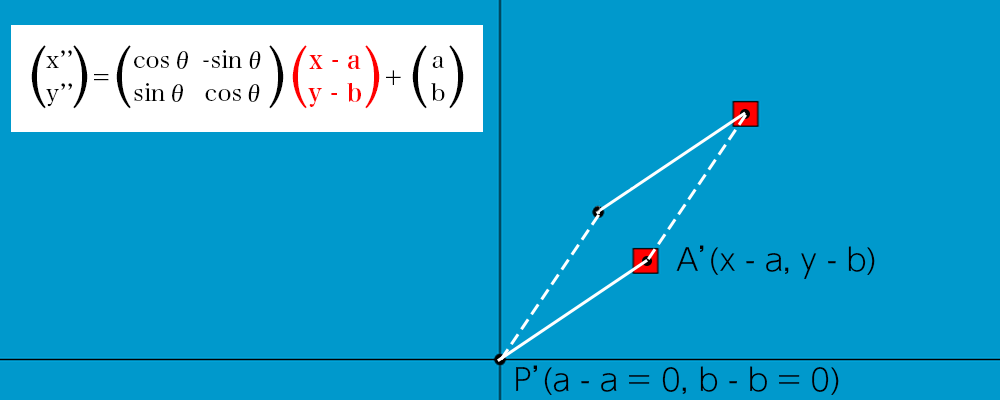
上図の状態から点P、Aそれぞれのxを-a。yを-bします。
すると、以下の図のように点Pが原点に重なるように平行移動します。
この時の点PをP’。点AをA’としましょう。
点P’は(a – a, b – b)なので(0, 0)となり、点A’は(x – a, y – b )となります。
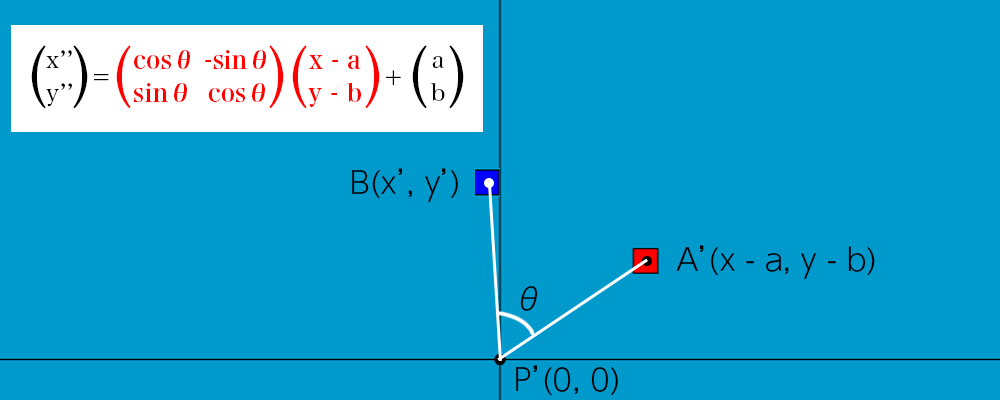
次に、点P'(原点)を中心としてθ°で回転の線形変換を行います。
すると、点A’がθ°移動した点Bが得られます。点Bは(x’, y’)とします。
2次元平面で表すと以下のようになります。
ここまでで任意の点を中心として回転させる線形変換の計算式の前半まで完了しました。
あとはカンタンです。
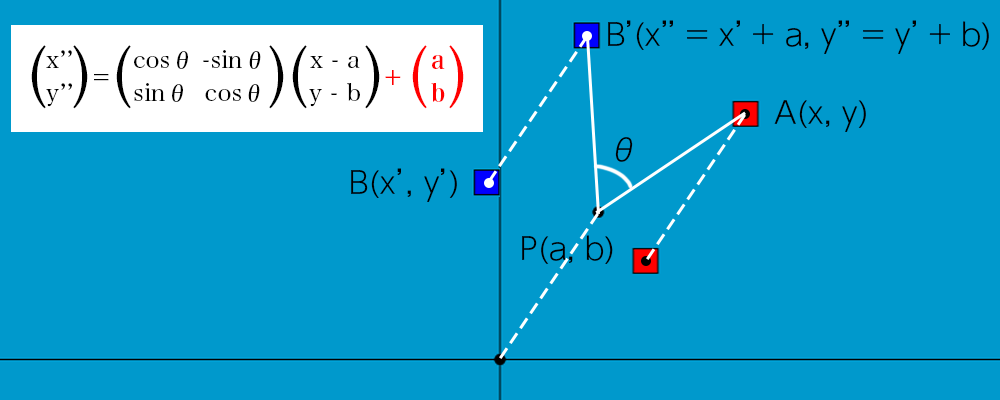
点数P’、A’、Bそれぞれのxに+a、yに+bをして平行移動させます。
この平行移動によって、点P’、A’は、元の点P、Aの位置に戻ります。
点Bは点B’に移動します。この点B’が点Pを中心にしてθ°回転した時の座標(x”, y”)になるわけです。
canvas上で回転処理を実装してみる
今回の成果物
まずは今回の成果物のスクリーンショットをどうぞ。
前半で解説した線形変換の計算式をcanvas上で実行してみた結果です。

赤ボックスが初期配置のオブジェクトです。(200, 200)の位置に配置しました。
回転の中心点は(80, 120)の位置に配置しています。
この中心点を元に赤オブジェクトを反時計回りに回転させ、回転後の位置にボックスを描画しています。
青ボックスは中心点を元に、赤ボックスを60°回転させたボックスです。
緑ボックスは120°。黄色ボックスは180°回転させています。
図解すると以下のようになります。

ソースコードの解説
それでは、ソースコードの解説に入っていきます。
ソースコードの構成は前回と同様です。
index.htmlとmain.jsがあるだけのシンプルな構成です。
index.htmlは前回から変わっていません。変更したのはmain.jsのみです。
main.jsの全文は以下の通りです。
|
1 2 3 4 5 6 7 8 9 10 11 12 13 14 15 16 17 18 19 20 21 22 23 24 25 26 27 28 29 30 31 32 33 34 35 36 37 38 39 40 41 42 43 44 45 46 47 48 49 50 51 52 53 54 55 56 57 58 59 60 61 62 63 64 65 66 67 68 69 70 71 72 73 74 75 76 77 78 79 80 81 82 83 84 85 86 87 88 89 90 91 92 93 94 95 96 97 98 99 100 101 102 103 104 105 106 107 108 109 110 111 112 113 114 115 116 117 118 119 120 121 122 123 124 125 126 127 128 129 130 131 132 133 134 135 136 137 138 139 140 141 142 143 144 145 146 147 148 149 |
// 画面の高さと幅 let width = 0 let height = 0 // canvas 要素 let canvas = null let context = null // 初期化処理 const init = function () { // 画面の横幅・高さを取得 width = window.innerWidth height = window.innerHeight // canvas を生成 canvas = document.getElementById('canvas') context = canvas.getContext('2d') canvas.width = width canvas.height = height // 原点を移動 context.translate(width / 2, height / 2) // y軸のプラス・マイナスを反転する context.scale(1, -1) // 背景を描画 context.fillStyle = '#0099cc'; context.fillRect(-(width / 2), -(height / 2), canvas.width,canvas.height); } // 円を描く処理 const drawCircle = function (x, y, radius = 10, color = "#000000") { context.beginPath(); context.arc(x, y, radius, 0, Math.PI * 2, false); context.fillStyle = color; context.fill(); context.stroke(); } // 線分を描く処理 const drawLine = function (startX, startY, endX, endY) { context.beginPath(); context.moveTo(startX, startY) context.lineTo(endX, endY); context.stroke(); } // 四角形を描く処理 const drawRect = function (x, y, width = 20, height = 20, color = "#000000") { context.beginPath(); context.rect(x, y, width, height) context.fillStyle = color; context.fill(); context.stroke(); } // 度をラジアンに変換する処理 const convertToRadian = function (degree) { return degree * ( Math.PI / 180 ) } // basicPoint を中心点として、target を線形変換(反時計周りに回転)し、変換後の位置を返却する const linearTransformation = function (target, degree, basicPoint = {x: 0, y: 0}) { // ラジアンを取得 const radian = convertToRadian(degree) // まず中心点を原点に移動した上で、線形変換を行う // x' = (x - a) * cosθ + (y - b) * -sinθ // y' = (x - a) * cosθ + (y - b) * sinθ const firstTransformation = { x : (target.x - basicPoint.x) * Math.cos(radian) + (target.y - basicPoint.y) * -Math.sin(radian), y : (target.x - basicPoint.x) * Math.sin(radian) + (target.y - basicPoint.y) * Math.cos(radian), } // firstTransformationに、中心点のx,yを加算した点を返す return { x : firstTransformation.x + basicPoint.x, y : firstTransformation.y + basicPoint.y } } window.onload = function(){ // 初期化処理 init() // 原点を描画 drawCircle(0, 0, 4, '#000000') // y軸を描画 drawLine(0, - (height / 2), 0, height / 2) // x軸を描画 drawLine(- (width / 2), 0, width / 2, 0) // 回転の中心点 const basicPoint = { x: 80, y: 120, } // 線形変換前の点オブジェクト const rect01 = { x: 200, y: 200, } // ボックスの大きさ const boxSize = 20 // 回転の中心点を描画 drawCircle(basicPoint.x, basicPoint.y, 4, '#000000') // 線形変換前のオブジェクトを描画 drawRect( rect01.x - (boxSize / 2), rect01.y - (boxSize / 2), boxSize, boxSize, 'red' ) // 中心点を元に60°回転させる const rect02 = linearTransformation(rect01, 60, basicPoint) // 60°回転させたボックスを描画 drawRect( rect02.x - (boxSize / 2), rect02.y - (boxSize / 2), boxSize, boxSize, 'blue' ) // 中心点を元に120°回転させる const rect03 = linearTransformation(rect01, 120, basicPoint) // 120°回転させたボックスを描画 drawRect( rect03.x - (boxSize / 2), rect03.y - (boxSize / 2), boxSize, boxSize, 'green' ) // 中心点を元に180°回転させる const rect04 = linearTransformation(rect01, 180, basicPoint) // 180°回転させたボックスを描画 drawRect( rect04.x - (boxSize / 2), rect04.y - (boxSize / 2), boxSize, boxSize, 'orange' ) } |
処理の流れは前回と同じで…
canvasの原点を画面中央に配置して、y軸のプラス・マイナスを反転。
そして、原点、x軸、y軸の描画を行った後、ボックスの回転処理と描画…となっています。
大きく変更になったのはlinearTransformation関数の中身です。
前回は原点を中心にした回転だけに対応していましたが、今回は任意の点を受け取り、その点を中心にした回転を行えるようになっています。
線形変換処理(linearTransformation)の解説
|
1 2 3 4 5 6 7 8 9 10 11 12 13 14 15 16 17 18 19 |
// basicPoint を中心点として、target を線形変換(回転)し、変換後の位置を返却する const linearTransformation = function (target, degree, basicPoint = {x: 0, y: 0}) { // ラジアンを取得 const radian = convertToRadian(degree) // まず中心点を原点に移動した上で、線形変換を行う // x' = (x - a) * cosθ - (y - b) * sinθ // y' = (x - a) * cosθ + (y - b) * sinθ const firstTransformation = { x : (target.x - basicPoint.x) * Math.cos(radian) + (target.y - basicPoint.y) * -Math.sin(radian), y : (target.x - basicPoint.x) * Math.sin(radian) + (target.y - basicPoint.y) * Math.cos(radian), } // firstTransformationに、中心点のx,yを加算した点を返す return { x : firstTransformation.x + basicPoint.x, y : firstTransformation.y + basicPoint.y } } |
では、肝心のlinearTransformation関数の中身を見ていきましょう。
…と言っても難しい事は何もやっていません。
linearTransformation関数でやっている事は、本記事の前半で解説した計算式を、そっくりそのままJavaScriptに置き換えているだけです。
はじめに引数についてですが、targetが回転対象の座標。degreeは回転させる角度。basicPointが回転の中心点となっています。
basicPointには初期値として、{x: 0, y: 0}を入れています。
この初期値があることで、basicPointに何も入らなければ、回転の中心点は原点となり、basicPointに座標が入れば、その座標が回転の中心点となるわけです。
処理の初めは、引数のdegreeからラジアンを算出しています。
この処理は前回と同じですね。
次に、中心点を原点に移動させた上で線形変換の計算をしています。
計算結果はfirstTransformationに格納されます。
このfirstTransformationが、任意の点を中心として回転させる線形変換の計算式の前半に該当します。
最後にfirstTransformationのxとyに、回転の中心点basicPointのxとyをそれぞれ加算します。
この加算が、任意の点を中心として回転させる線形変換の計算式の後半に該当します。
これで任意の点であるbasicPointを中心に回転した後の(x, y)が得られます。
あとは戻り値を使って、ボックスを描画するだけですね。
まとめ
前回から引き続き、線形変換を使ってcanvas上での回転処理を実装しました。
ここまでくれば、どんな回転であっても表現できそうですね。
次回も、もうちょっとだけ線形変換をやってみたいと思います。
もうちっとだけ続くんじゃ。
次回の記事: JS奮闘記【JavaScriptとcanvasと線形変換 その3 ~様々な線形変換編~】


